Building our home network
# February 9, 2025
I spent the last week upgrading our home network from a Nest Wifi (average real world speeds ~300mbps) to a wired 10gbps network.
This saga started back in January 2024 when we moved back to San Francisco and switched our internet provider to Sonic1. They started as a Santa Rosa based neighborhood ISP and have been slowly making inroads to different parts of the Bay. They came to our neighborhood with gigabit speeds with the promise of soon upgrading to symmetrical 10gbps.
So I did what any self-respecting software engineer would do: I found some vague excuse to upgrade our network.2
Motivations
"When's our internet going to be back up?"
- My girlfriend, most days this week.
Look, I get it. This whole thing seems a little overkill. 10gbps in your apartment? Really, Pierce? That's like putting a Maserati engine in a Prius. Plus there's no site that will actually serve that much bandwidth to you. And yes you're largely right. But let me try to muster some real arguments for a home network upgrade.
-
ML Datasets Because datasets are usually split between multiple files, a lot of the cloud hosts (shout out to Backblaze B2) let you download a near unrestricted amount of files at the same time. When parallel threaded correctly you can certainly get >2.5gbps downloaded at the same time.
-
Remote Uploading I don't typically mind downloading files at 300mbps. But when uploading Docker images or a huge backup of my laptop or database, I'd like to have a bit more speed. My own data center servers usually give me closer to 1gbps upload speed anyway.
-
Video Editing A 10gbps network both unlocks higher Internet speeds and also sets the maximum speed within your network when you wire up devices to one another. As I've started doing more video shoots for work, the raw file sizes have gotten a bit out of control. I needed some more external storage anyway and ideally could stream the raw contents over the network straight to Final Cut.
-
Concurrency Sometimes it's not about any one site serving you a lot of bandwidth. But when you're dealing with multiple different sites (backups, S3 data, streaming, etc) you can potentially saturate your connection before you saturate theirs.
With some vague justifications in mind, I started looking into upgrading our network to really make the most out of that 10gbps coming through the wall.3
Starting point
When they install their service, Sonic gives you an Optical Network Terminal. This looks a lot like the box that Comcast would provide alongside their coax cable. But unlike a Comcast box (which these days is a combined modem and router), the ONT is just a device that digitizes a fiber optic signal. It reads the light from the fiber optic cable and converts it into a data stream that's output through Ethernet.
This is the closest thing to a raw pipe into the Internet that's out there. If you plug it into your computer, you'll get an IP address. Same thing with a Wifi router. When you plug it in, every device on the network will get an assigned IP address too. Our Google Wifi used to do this heavy lifting. But behind that hockey puck there's a lot going on. And you'll discover that the hard way the second that you're trying to structure your network other than Internet -> Wifi.
I figured I didn't need anything crazy: I just want my laptop to have 10gbps access to the Internet when I'm sitting at my desk. No need to upgrade to wifi 7, no need for 6ghz band wireless, just good old wired cables. So I started from my M1 Mac's specs. It supports 10gbps connection but it doesn't have a 10gbps Ethernet port. It can only drive this signal speed over Thunderbolt, so you're going to need to get an adapter to convert Ethernet to Thunderbolt.
There are a few different options. The OWC adapter got solid reviews and I've always liked their products. I couldn't find a used option on Ebay/Craigslist for any cheaper so I grabbed a new one from Amazon.4
I also jumped the gun and bought a TS-Link 10gbps compatible ethernet switch. I was under the flawed assumption that our existing Google Wifi would just pass through the 10gbps signal into a switch. A simple switch should be able to share the 10gbps signal to the rest of the network and you're off to the races.
Turns out we had a verison that only supported 1gbps. So I was stuck with a 10gbps ethernet adapter, a 10gbps switch, and a 1gbps router.
Could I just plug the switch into the wall directly? Well technically yes, and that worked fine for my Mac during my initial speed tests. But it's not a great idea longer term since you're only relying on your local computer's firewall to keep the bad actors out. A dumb router with discrete network rules (and a smaller attack surface) is a better solution. Plus Sonic doesn't really support it. Plugging in too many devices directly to the switch will give each its own IP address and Sonic has a relatively small limit on these per residental connection. Once you fill up your allocation of MAC address to IP address mappings, you'll have to call to reset them.
The design of the network assumes a residential gateway or router connected directly to the ONT. -- Dane (Sonic's CEO)
The same Sonic forum had a thread where people shared some of their network topologies. It's a bit out of date; back in 2022 not much consumer grade hardware supported a 10gbps ethernet passthrough. Now you can pick up some Wifi7 routers that support it but for a mesh network they'll run you about $600 per node.5 That was a bit too expensive for this side quest.
So back to the drawing board. How do we design this network from the top?
Network design
This really brought me back to my networking classes in college. But even those were focused more on TCP and low level networking protocols. Less on configuring physical networks.6
Networks form one big ring that keep expanding outward. At the center you typically have your internal network: that's just stuff hosted in your closet that you want to keep private. All devices within your network can talk to each other but outside devices can't talk to them. All devices in your home belong to a local area network (LAN). Everything outside your network is the "WAN" (Wide Area Network). In our case the WAN is the full Internet.
Router: A device that connects your network to the Internet. It serves to isolate the networks from one another, in other words acting as the bridge between your LAN and the WAN. It takes one IP address from Sonic and shares it with all the devices on your network through Network Address Translation (NAT). They're also sometimes referred to as a "gateways" since they cross two different networks. But while a router is a gateway, a gateway is not necessarily a router.
Switch: If you have only one cord coming into your network and need it split to different places, you'll need a switch. There are managed and unmanaged switches. The managed ones give you a web interface to configure the network. The unmanaged ones assume everything will share the same local network. At their most advanced the management interfaces only support splitting the network into virtual subnets; they don't support any kind of packet filtering. While it's a bit of a simplification, I think of routers as a full CPU that can inspect packets and make decisions on what to do with them. A switch is a dumb device that just forwards packets between devices.
In addition to firewall protection, the router also provides a DHCP server to assign IP addresses to devices on your network. The ONT provides them at the network level by MAC address and this table is quite limited for each ONT since Sonic doesn't want to over allocate IP addresses.
Router
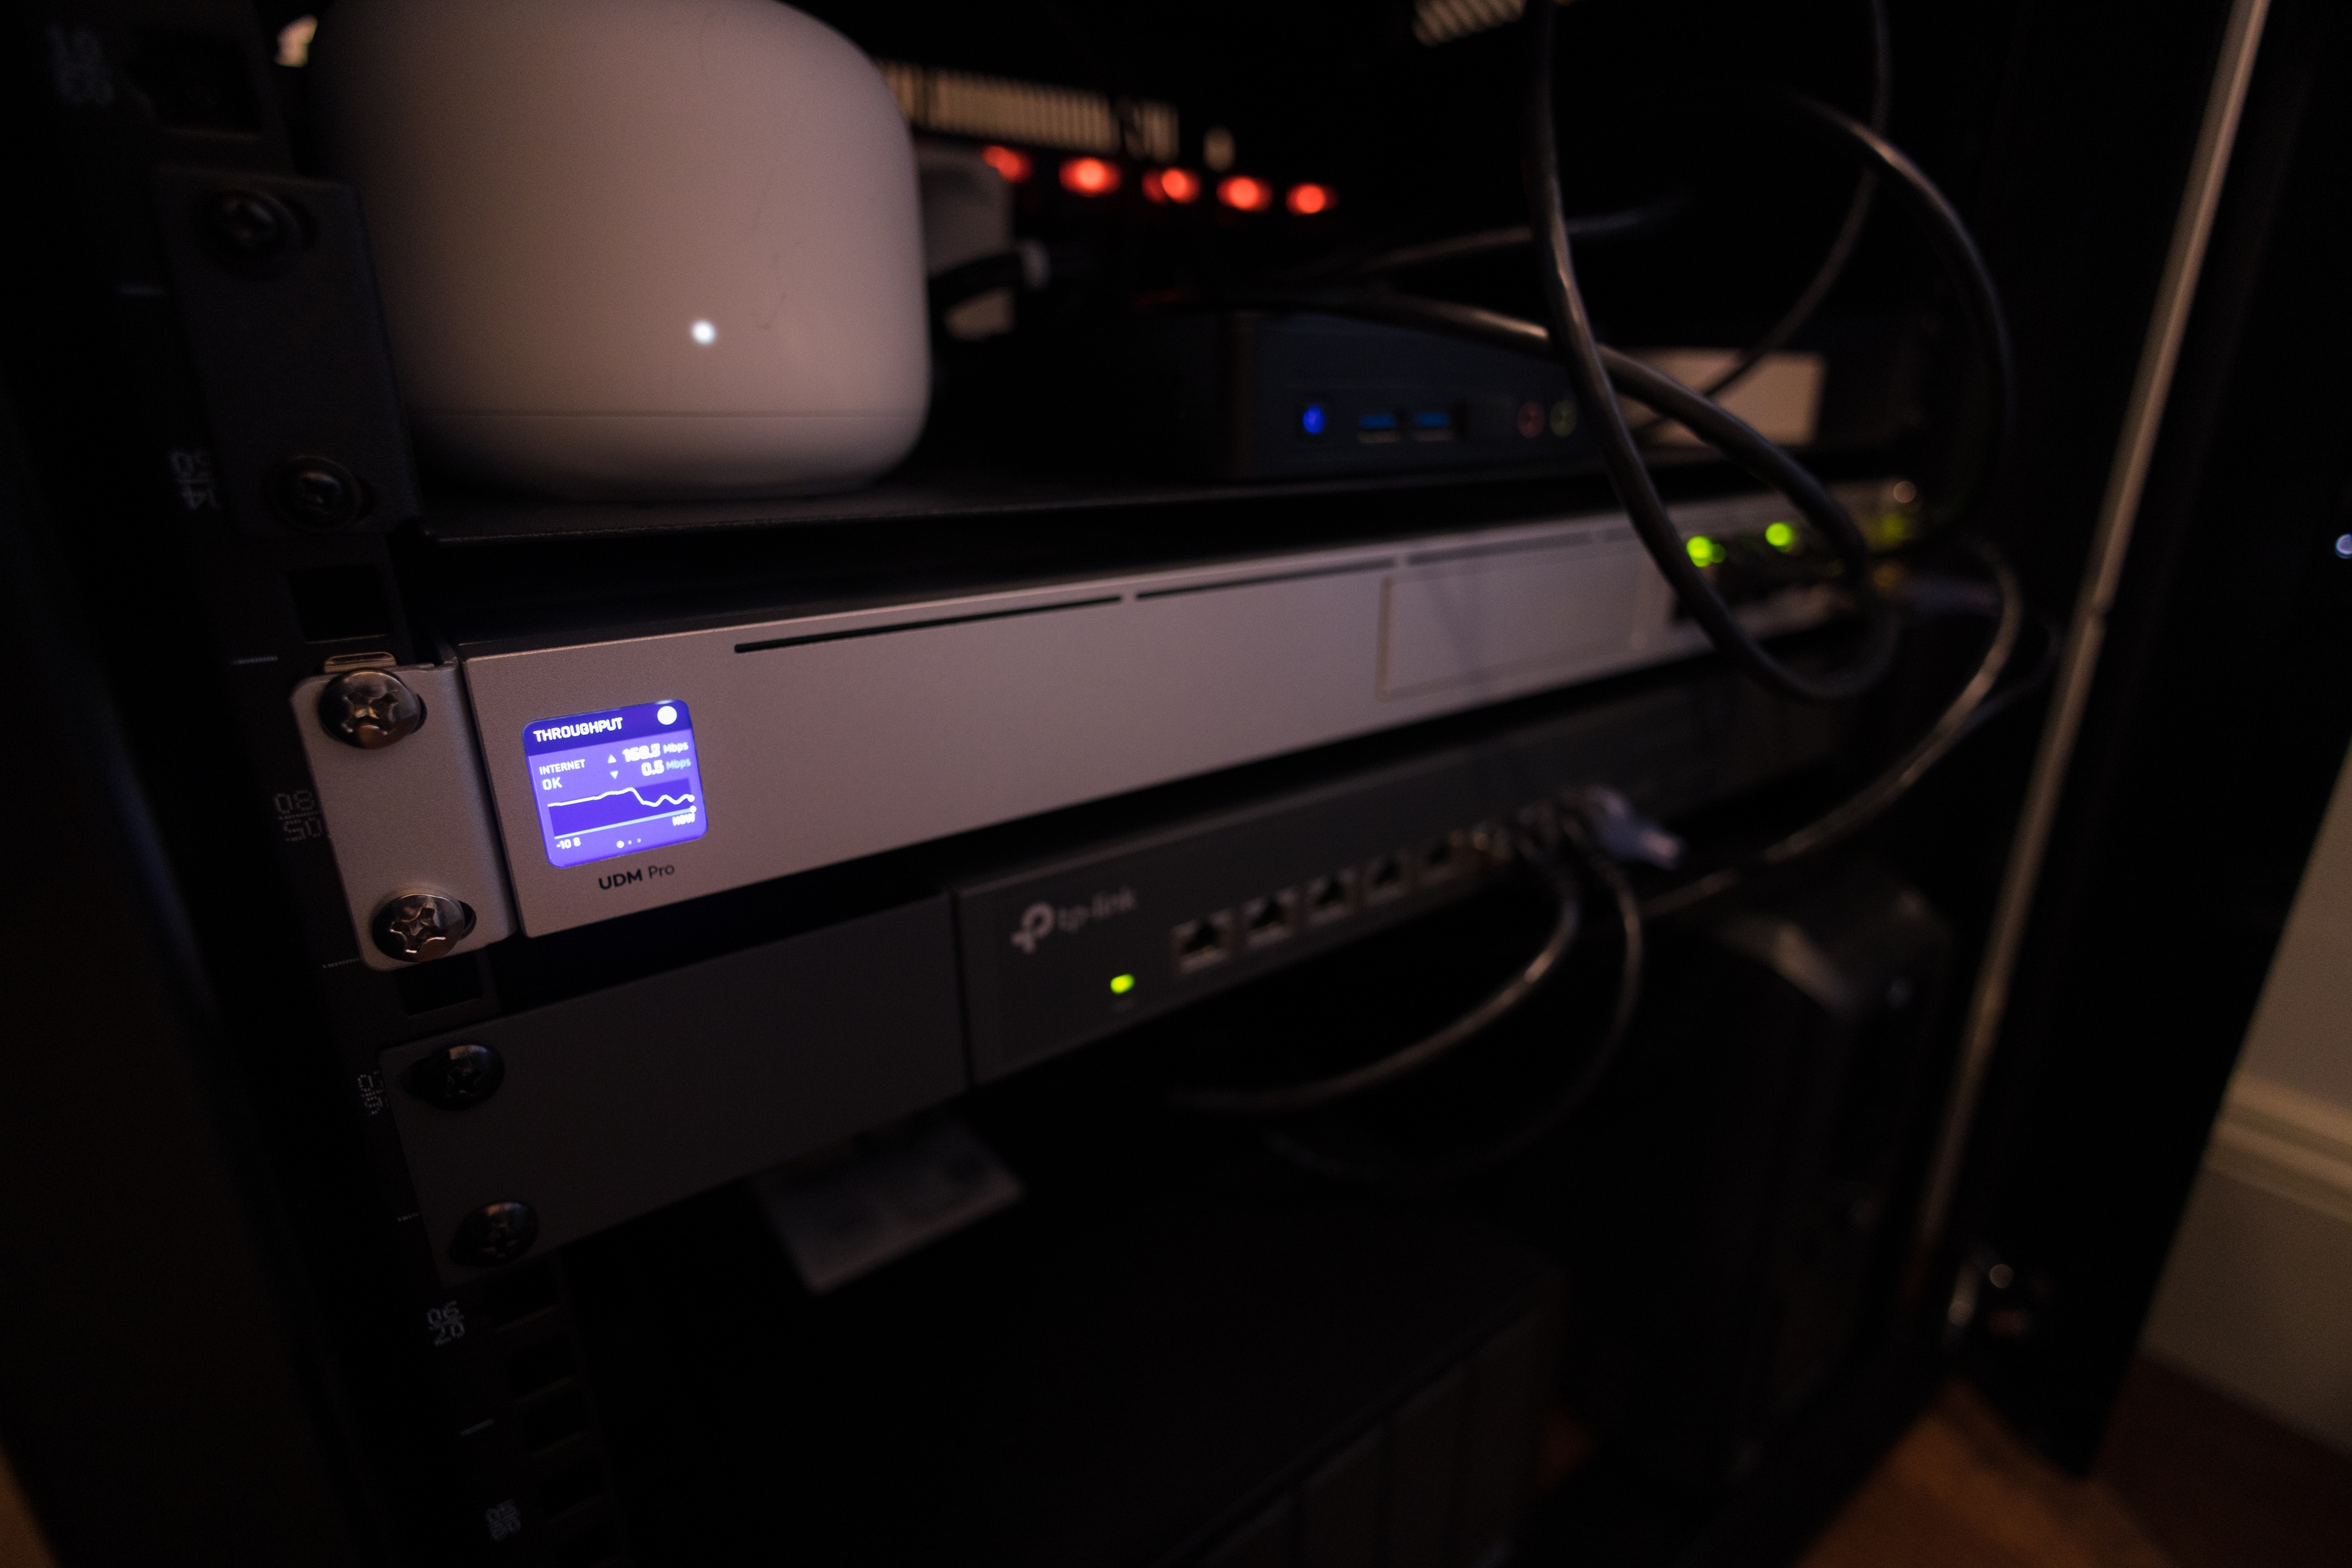
One of the more afforable routers for a 10gbps network is the Dream Machine Pro at $379. It's big if you're used to the size of your average router: it's intended for deployment in server racks or data centers. But it's user friendly, has a built-in switch for 1gbps connections (not all devices need 10gbps after all), and packet filtering. Packet filtering is powered by IDP/IPS, which is the main standard for inspecting packets and making decisions on what to do with them. Acronyms are a dime a dozen in networking - and Intrusion Detection and Prevention & Intrusion Prevention System is a bit of a mouthful.
The Dream Machine provides full 10gbps as a LAN passthrough, ie. with no active packet filtering. You'll still block malicious external traffic since it sets up a firewall, but it won't stop suspicious network traffic from within your network. It can only run IDP/IPS at 3.5gbps - this slow-down from raw speeds is because they have to independently analyze each packet, or at least the headers of a bundle. This is CPU limited and the Dream Machine just doesn't have a powerful enough CPU to do this. The Firewalla Gold Pro seems like the only consumer product that can do full packet filtering at 10gbps, but much as you'd expect, it will run you. Currently $889.00 at the time of writing.
For the purposes of our 10gbps network, the Dream Machine has:
- 1x 10gbps WAN port, SFP+
- 1x 10gbps LAN port, SFP+
- An integrated switch with 8x 1gbps ethernet ports
The first two are the important ones for us.
Ports, wonderful ports
After picking up the Dream Machine, I needed to get a few more parts. All the Ethernet ports on the router only run at 1gbps. 10gbps is only run through SFP+ ports. Let's talk ports.
The SFP family is everywhere so it's worth getting aquainted:
- SFP (1G): Typically supports up to 1 Gigabit Ethernet.
- SFP+ (10G): Designed for 10 Gigabit Ethernet, offering higher performance while maintaining a similar physical form factor.
- SFP28 (25G): Used in newer applications for 25 Gigabit Ethernet.
- QSFP/QSFP+ (40G/100G): Although not strictly “SFP,” these are part of the same family of modular ports but support much higher speeds (40 Gbps or 100 Gbps).
Physically, SFP ports look funky. Just a deep empty box. To get them to do anything, you'll need an adapter: either SFP to Ethernet or SFP to optical if you want to transfer through a fiber connection. Unlike Ethernet, SFP ports can't provide power to end devices. They are solely designed for data connectivity.
Ethernet 10gbps ports cost far more than 10gbps SFP+ ports. But if you want to eventually end up at Ethernet (which 99% of the time you will) you'll need an adapter to convert the SFP+ ports to ethernet. These cost about $35 but importantly they can generate a good amount of heat depending on the rig. So for passively cooled (no fan) devices you'll probably need to get a heatsink or an external fan. I honestly wouldn't bother. I just got a 10gbps Ethernet switch from the get-go.
Vendors use RJ45 and Etherent interchangably. 10 GbE RJ45 is basically the same thing as 10 GbE Ethernet. Technically RJ45 is a type of Ethernet connector and Ethernet is both the physical cabling and the protocol. But RJ45 is what most people think of when they think of an Ethernet connection so the term duplication is reasonable.
To connect these ports to one another you'll need the right cable. Cords are rated for different speeds (CAT6 vs. CAT6a vs CAT7) - and networking devices will automatically negotiate the speed between devices by taking the cable type into account. You could very easily have all 10gbps hardware and an old 1gbps cable and have it only run at 1gbps. So make sure to triple check your cable especially before you start cabling it through your drywall.
There are also cables with different bend tolerances, which can make them easier or harder to fit within your enclosure space. Right now I'm using a mix of Monoprice cables that have more bend and Cable Matters cables that are a bit older. If I had to do it over again I'd just get all Monoprice cables.
NAS
When your network is fast enough, adding accessories that would normally be mounted directly to your computer becomes a lot more practical. I had previously used an Drobo external drive for backups and media files, but with their bankruptcy I needed to find a new solution. Attaching storage directly to the network would let me do some light editing/backups over Wifi while still maxing out the speed of the HDD disks when plugged in.
Buying a NAS in 2025 feels like buying a computer in 2005. There are a ton of different SKUs, some subtle hardware differences, and a crowd of people who still advocate for just building it yourself. But amongst the homelab crowd, the two leading brands are QNAP and Synology. I won't get into a full comparison here. But my takeaways:
- Synology is more expensive for apple-to-apples hardware. But they have a more passionate community.
- QNAP NAS systems require all disks to be the same size to maximize the usable capacity. Synology has their own software implementation (SHR1 and SHR2) that allows you to raid disks of different sizes.
- There aren't a ton of deals to be found on Ebay on either hardware. There's not a huge drive-off-the-lot markdown for previously owned NAS devices.
I went with the cheapest QNAP that I could find that supports 10gbps, the TS-932PX. It has 5 bays for HDDs and 4 ports for SSDs. These SSDs can either be built into their own RAID array or used as cache disks for the HDDs to make reading or writing faster. There are some cons to SSD caching so I'm planning on eventually using these as a separate cluster7. For now I'm just filling my HDD bays with 4x10TB disks.
The biggest downside of this QNAP is that it has an ARM based CPU. The selection of third-party packages is a bit more limited and I've noticed a clear lag when trying to use their web UI. Also there are some claims that it doesn't have the capacity to drive a 10gbps network connection. But in most cases with HDDs you're going to be more limited by the spinning platters than the network connection. The estimated maximum write/read speeds you can get from these disks is usually 200mb/s anyways. Still a far cry from the 1GB/s that the network can support. Overall I'm still happy with it.
Switch
Since the Dream Machine only has one 10gbps LAN port, I needed a switch to convert that signal onto multiple devices.
I was originally going to get a cheap MikroTik to be my switch but alas:
You cannot fill a CRS305 with 10G copper transceivers. It's passively cooled and MikroTik themselves advise that if you absolutely have to run 10G copper transceivers on that model, limit it to no more than two and make sure they go into opposite sides of the switch (as far away from each other as possible)." -- Reddit
I eventually went instead with the TP-Link TL-SX1008. It has 8 ports at a full 10gbps. I also got it on a steep discount. Reviews warned about the noise of the fan (including people going so far as to disassemble the unit to swap out the fan). They might have upgraded their fan in more recent models; I haven't noticed any excessive noise even when powering 4+ ports.
The TP-Link is an unmanaged switch, so there's no interface to configure the network. You just have to treat the entire thing as a logical element, so all plugged in devices will receive the same permissions. For home use I imagine this is always going to work out just fine.
If you need more 10gbps enabled ports than the TP-Link, QNAP has a lot of options in their switch lineup as well. The QNAP-QSW-3216R would probably be my recommendation for an upgrade. If you need more switches and don't want to chain them together, you're moving up into an enterprise level switch like the EnterpriseXG 24. If you have that at home, I really need to hear how many Raspberry Pis you're running in your closet.
An aside on DHCP
Right after migrating to our new network, I had some issues with our NAS not resolving to a valid IP address. It kept assigning itself a 169.254.x.x address. And it wasn't accessible through any other devices.
But then I noticed the 169 prefix. This IP was a key indicator of what's going on: this was an APIPA (Automatic Private IP Addressing) address. An APIPA is a self-assigned address, which devices assign themselves when they can't get a proper IP address from the network's DHCP server.8
The issue was that the Google Wifi router was trying to handle DHCP requests on its own and that conflicted with the Dream Machine Pro's DHCP server.
The key is to avoid having two separate NAT/routing layers (a.k.a. “double NAT”) so that all devices are on the same subnet. Here’s how to achieve that:
-
Use the Dream Machine Pro (DMP) as your Primary Router:
Since the DMP is closer to the wall and has better hardware anyway, let it handle all DHCP, NAT, firewall, and routing functions. -
Set Up Google Wifi in Bridge (Access Point) Mode:
Configure your Google Wifi to operate in bridge mode. This disables its own NAT and DHCP services, making it function solely as a wireless access point. This way, any device connecting via Google Wifi will receive its IP address from the DMP and be on the same network as wired devices. You can toggle this Bridge mode via the Google Home app. -
Verify Network Settings:
Once set up, ensure that the Google Wifi’s SSID (or a newly configured one) is broadcasting and that devices connecting to it are getting IP addresses in the same range as the rest of your LAN (managed by the DMP). This will allow all devices—whether wired or wireless—to “see” each other.
DHCP is related to NAT but they're not exactly the same thing.
IP Assignment: When a device connects to the local network, the DHCP server on the router assigns it a private IP address.
Traffic Flow: When the device sends data to the internet, the router (performing NAT) replaces the device’s private IP address with its public IP address in the outgoing packets.
Maintaining Sessions: NAT keeps track of these mappings so that when a response comes back to the router’s public IP, it knows which private IP (and specific device) the data should be forwarded to.
Default Gateway Information: DHCP also informs devices of the default gateway, which is the NAT device (the router). This ensures that devices send external traffic to the right place for NAT translation.
The build
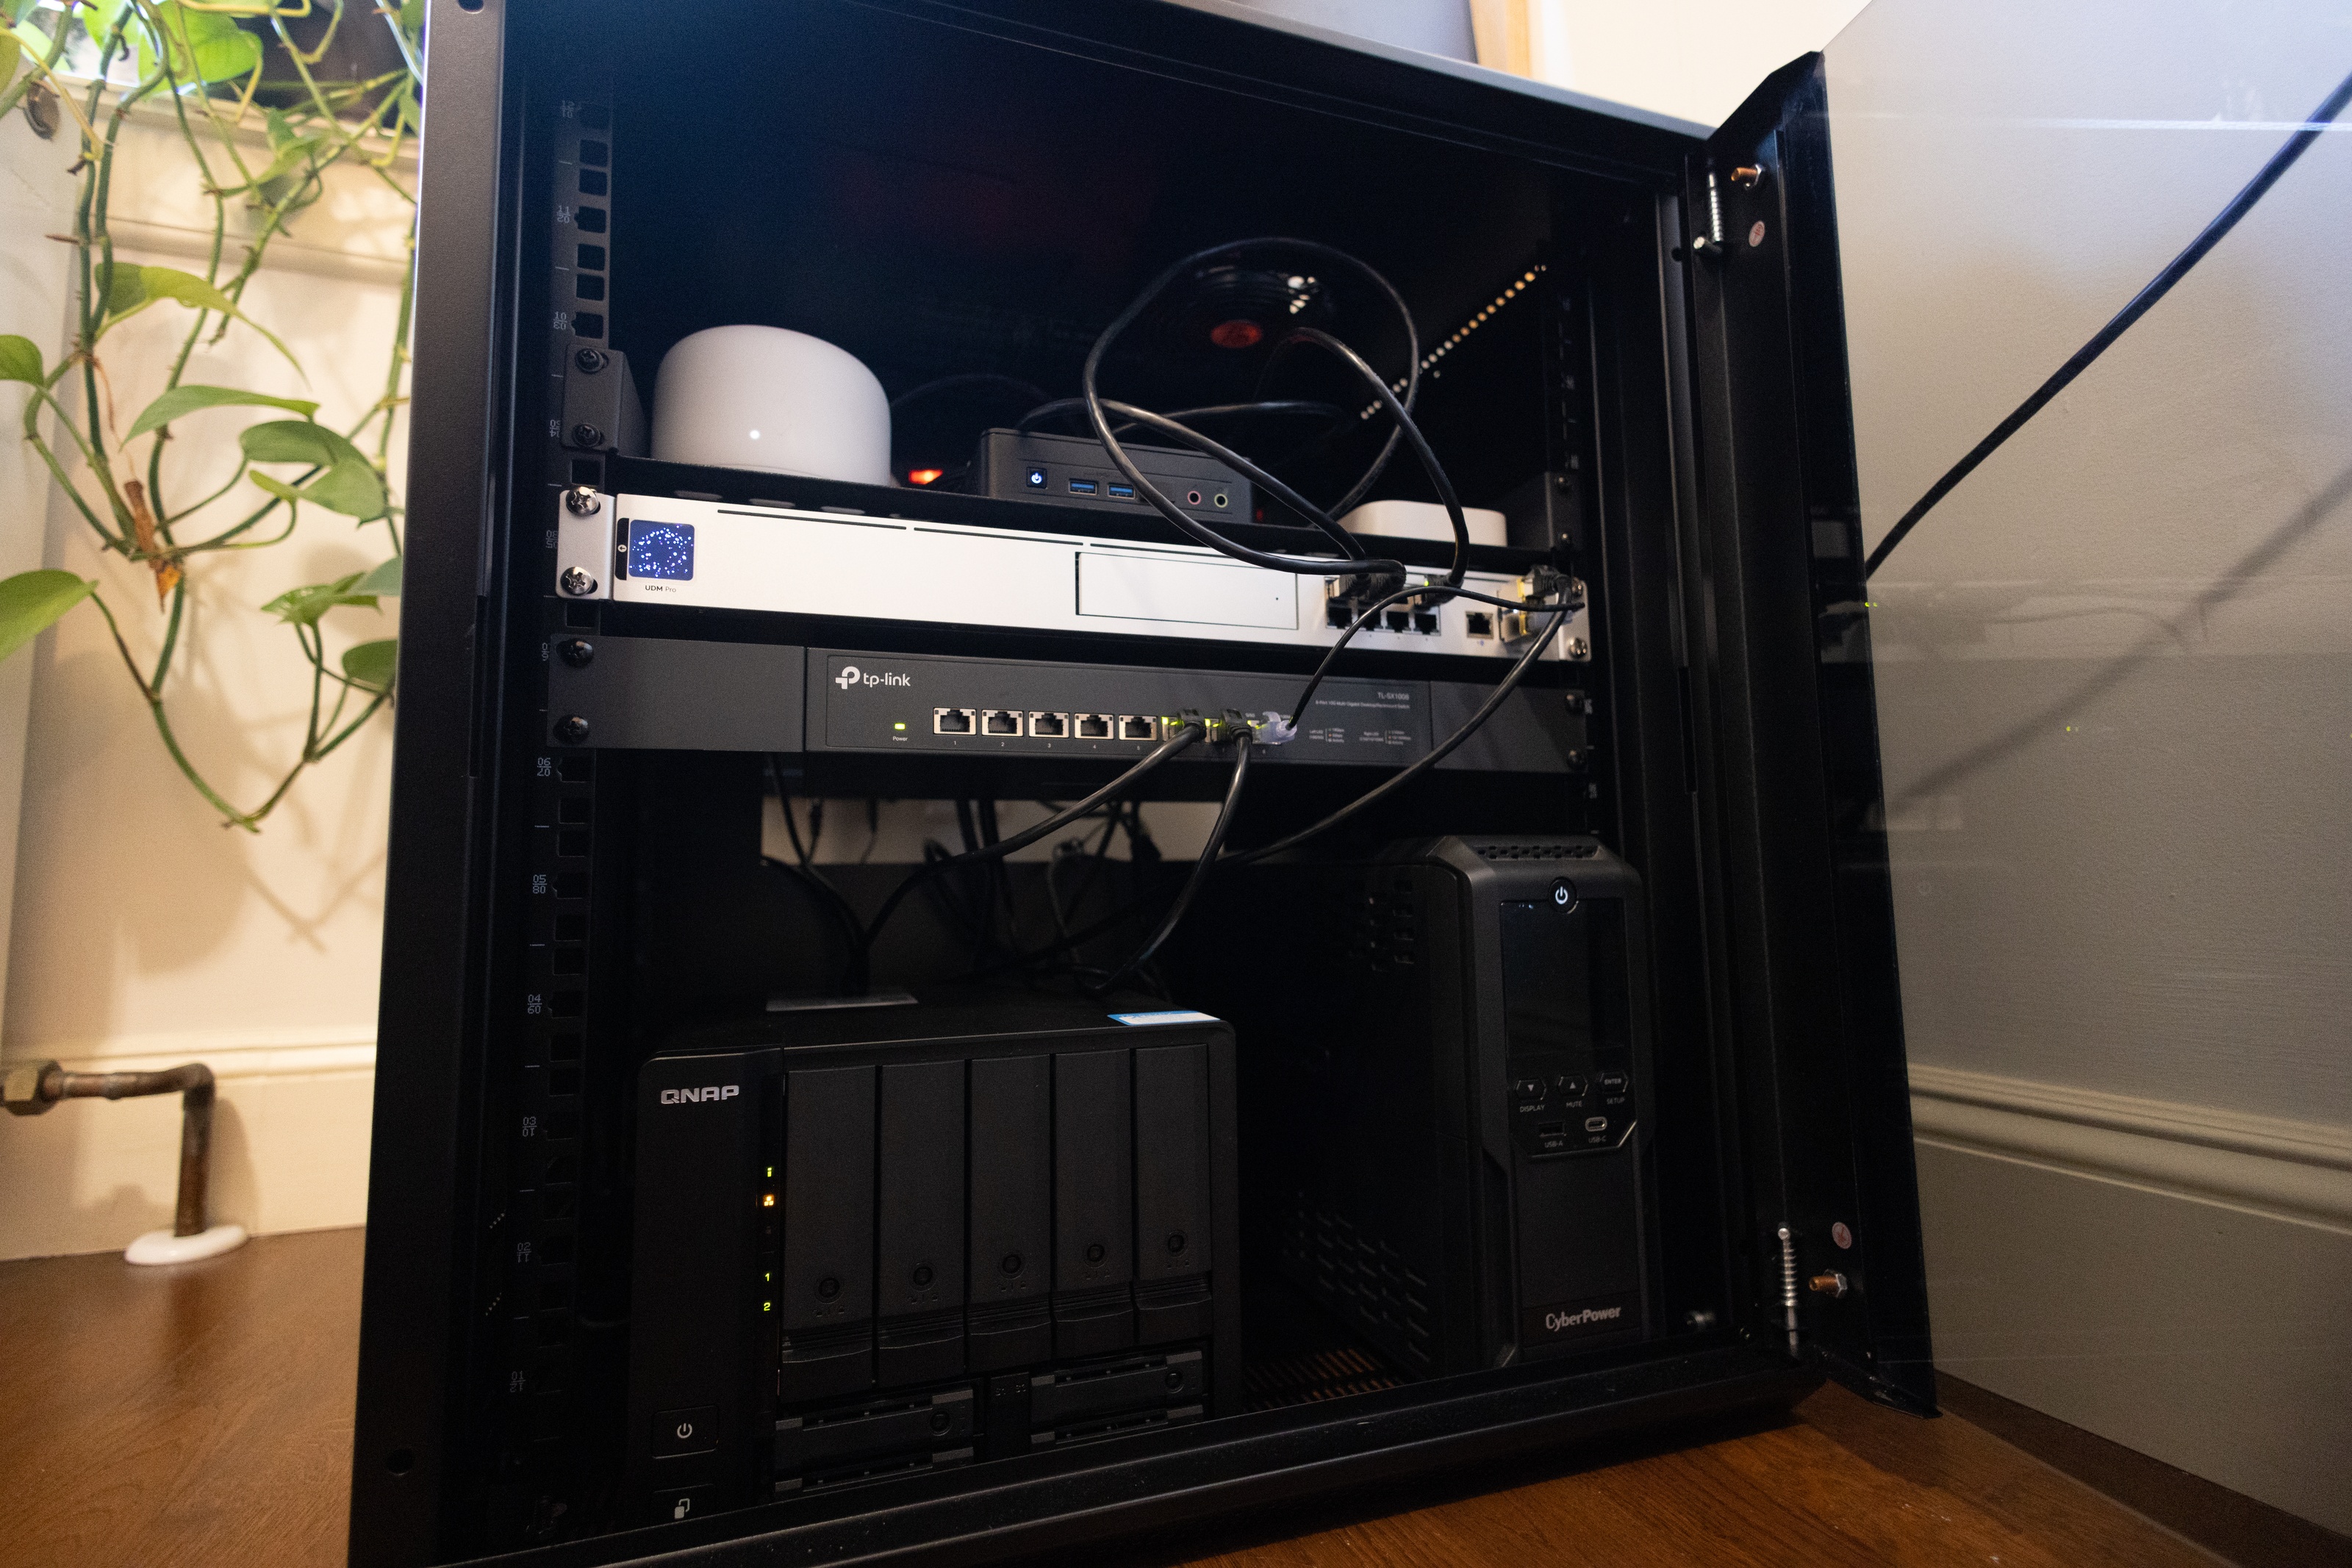
While I was at it, I thought it was time to organize the pile of wires that were slowly expanding in my office. Enter: the wonderful world of server racks. Also enter: another rabbit hole I had to fall down before checking this off my todo list.
A server rack is a pretty generic term for anything that stores hardware that might be used in a data center: networking, storage disks, servers, etc. Most networking equipment is designed from their offset to fit in a rack. It makes everything more consistent and ends up being much easier to assemble. Most hardware actually comes with a rack mount included since it's the defacto expectation when you buy them.
Server racks come in a bunch of different shapes and sizes. The most common are 19" racks, which is the standard width and what matches most standard hardware. The height is usually measured in rack units (U). You can mount your hardware on any level of the rack, and there are common shelves that you can install for any equipment that doesn't have a rack mount included.
I was originally going to build a custom wood housing to better go with the oak shelves in my office. You can buy rack rails yourselves and mount them to any exterior. But I decided to save that project for another day and bought this pre-built rack from Amazon. It's basically what you see in the pictures. 12U tall was more than enough to fit my networking gear, wifi puck, home Intel server, NAS storage, and backup power supply. The build quality is solid but some of the screw holes don't quite line up across the other pieces of the rack. I had to skip a few screws since they wouldn't fit right. You also have to manually pop out the back if you want to feed wires out of it: make sure to have a saw or some pliers that can cut through the metal tabs.
The reviews gave me fair warning - the stock fan is loud. Like, really loud. It matches the decibels of my standing Vornado fan that I use as whitenoise at night. But it was easy enough to swap out with a compatible 120mm fan. It's not silent but I can comfortably run it next to my desk 24/7 and treat it like regular background noise.
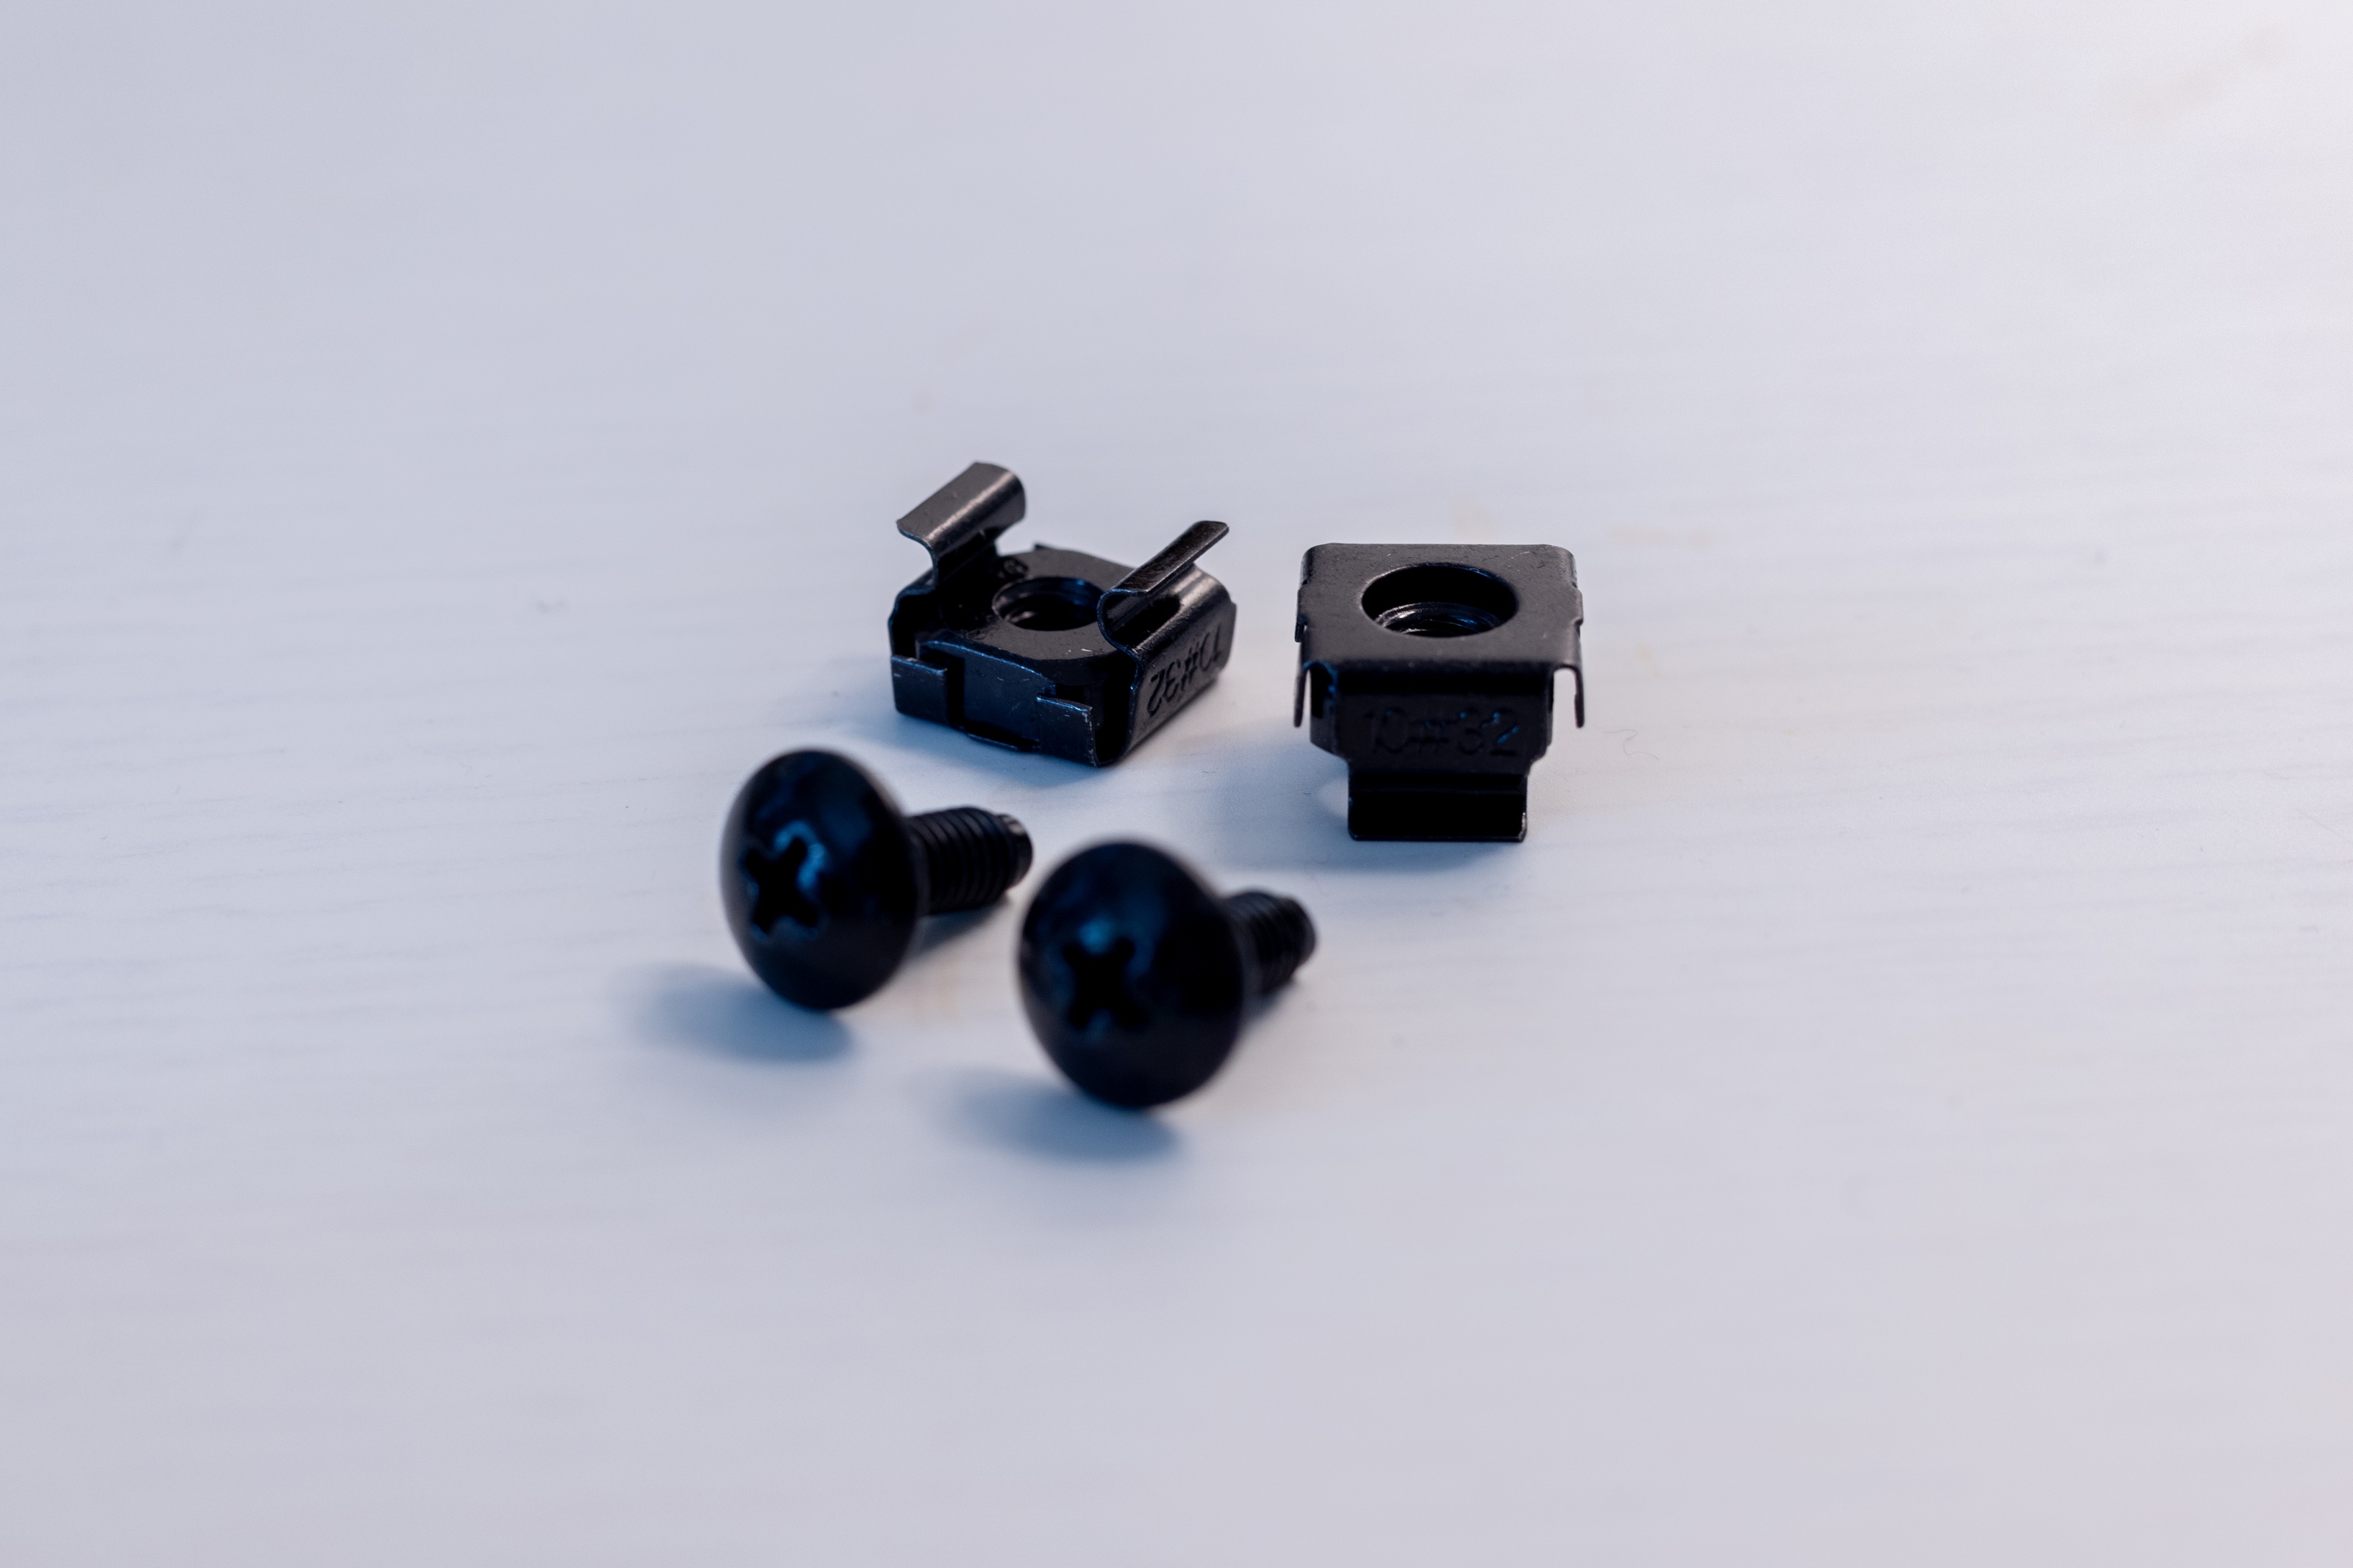
Building the rack was pretty easy. Installing the actual equipment took some getting used to.
Rack rails have square holes in them. To mount equipment inside them you have to use the mounting brackets. To get them installed you pinch the tabs on the back of the bracket and push them (with some force) into the rack.
You then lift up your gear against the mounting plates and screw them into place. I found that I had to contort myself a bit to align the screws with the brackets. My approach was to loosely screw in the top ones on each side, then do the bottom ones before fully tightening. Tightening one before the others gave more tension to the plate but often resulted in mis-aligning the brackets.
If you're dealing with really heavy equipment like a server or power supply, you might need to buy support braces. These connect your front rack rails to your back rack rails to give more load bearing support. I was able to get away without them since mine were light enough.
Getting everything together when I had the right hardware took ~15 minutes. And then it was time for the moment of truth. I connected the switch Ethernet to my Thunderbolt converter and then my M1 Macbook.

9.1 sweet sweet gigabits a second. Incredible for pushing out heavy files but equally useful within the local network. Plus I love the final form factor: a compact, quiet metal cube that sits in the corner of my office. It can sit there even when I'm out of town and make sure everything's backed up remotely.
Community
More so than many CS communities online these days, the people that hang around Homelab discords and r/homelab are really fantastic. They're friendly and the collective knowledge is wild9. I recommend both joining those communities and using them as your default search engines when you're trying to figure out how to do something or weighing the pros and cons of different configurations.
One thing you'll find if you spend enough time in this community is there's always going to be on voice in the comments that just recommends building your own hardware. pfSense, TrueNAS, etc. Most enterprise level networks are built with these open source frameworks. They're great and they're powerful.
I think it's fair to say that if you really want to stretch your budget to the max, they'll give you a better bang for your buck. But that places the burden of maintance squarely on you. There's no one to call, no 24-hour customer support line, perhaps even no other config that's set up exactly like you did. For my day job I make that choice all the time. But for my home network I like to have a little more peace of mind. The choice is yours.
A simpler network
If you want to upgrade your wifi network to Wifi 6E or Wifi 7, my configuration is probably overkill. It's way simpler to buy a Wifi 6E router and hook a 10gbps switch into the LAN port if you still want to connect your computer or NAS into the wired network. That also has the benefits of sharing the new speed improvements with all your devices, not just the wired ones.
But in my case I was able to pick up a Dream Machine and a TP-Link switch for under $500, well under the cost of upgrading 2 of our mesh network nodes to Wifi 7 or even 6E. So I'd consider being opportunistic on eBay for a few weeks and seeing what pops up.
-
Since living in San Francisco I've had 3 ISPs: Google Fiber, Xfinity, and now Sonic. Two of them are significantly better than the other. ↢
-
In my case: coordinating video editing with a team in Nepal. Don't ask. ↢
-
In the infinite wisdom of early network engineers, data transfer is measured in bits per second but things being transferred are usually measured in bytes per second. So 10gbps is actually ~1.25GB/s. Get ready for a lot of divisions by 10. ↢
-
I didn't expect Amazon to be as strong in the networking game as they ended up being. I've been able to find most of the parts I needed for this build on there. ↢
-
Look out for a "10gbps backhaul" to make sure the LAN also supports 10gbps speeds. ↢
-
Since everything has been virtualized in the cloud with VPCs, you never have to think about this stuff. We've achieved a pretty crazy abstraction for networking over the last 15 years. ↢
-
For a deep dive here, check out the NASCompares breakdown. ↢
-
I didn't expect Amazon to be as strong in the networking game as they ended up being. I've been able to find most of the parts I needed for this build on there. ↢
-
For a deep dive here, check out the NASCompares breakdown. ↢
-
The trick to getting into the NAS anyway is to set a static IP on your computer in the same subnet. If you share the same subnet - even if it's an APIPA address - you should be able to access the NAS. In my case I set my Network settings in System Preferences to
169.254.10.100and I could see the NAS interface and debug from there. ↢